
How to Avoid the Most Common 3D Printing Mistakes
Although there are countless methods and material options in 3D printing, it often happens that the workpiece is not as expected after printing. This is partly due to the limitations of the technologies, but also to other factors that are often avoidable. In order to achieve the best possible results with us, we have summarized some tips for you in this article.
1. Problem: Warping
“Warping” in the field of 3D printing refers to the deformation of a workpiece due to different cooling rates. Warping usually results in printed objects twisting or warping in a wave-like manner. As a result, the workpieces not only suffer from visual impairments but can also lose their functionality.
What Causes Warping?
The cause of warping is the temperature difference to which the various printing layers are exposed during the printing process. As the workpiece cools, the material contracts, changing the surface tension and causing warping. Almost all processes (stereolithography, selective laser sintering, FDM/FFF, and sometimes metal laser melting) are affected by this effect. This effect is generally not present in ColorJet and PolyJet technology.
Long, flat, or very delicate elements without support structures are most affected.
Measures to Reduce/Prevent the Effect:
- Avoid designing your 3D model with elongated, very flat elements.
- Increase wall thickness for larger areas.
- If delicate structures or thin wall thicknesses cannot be avoided, print the component at an angle of 45 – 60°. This may require increased use of support structures (for stereolithography & FDM/FFF).
2. Problem: Tolerances – Object Dimensions Differ from CAD Design
3D printing processes are generally less precise than machining processes. Especially when objects are supposed to fit into each other, complications can arise. To avoid this problem, tolerances should be considered during design.
The Importance of Tolerances in 3D Printing
Generally, for objects <10 cm, there is a tolerance of ±0.1 – 0.5 mm (depending on the 3D printing process used – more information on tolerances in 3D printing). For objects >10 cm, you should expect tolerances of ±0.1% to ±2% depending on the process.
The origin of inaccuracies is diverse and process-dependent. Often, it is due to the cooling of the workpieces immediately after the printing process, causing different shrinkages in the workpieces. However, chemically induced shrinkage processes or mechanical inaccuracies also play a role.
What Can You Do About Inaccuracies?
- The most practical way is to consider inaccuracies in the 3D model itself.
- For interlocking workpieces, we recommend leaving at least 0.1 – 0.5 mm of space between the elements, depending on their size and the printing process.
- Adapt your design to the printing method; sometimes, the design for 3D printing differs from that of other production methods. Feel free to contact us with any questions.
3. Problem: Unclear/Illegible Details
It is possible that very small lettering/logos or details are not legible.
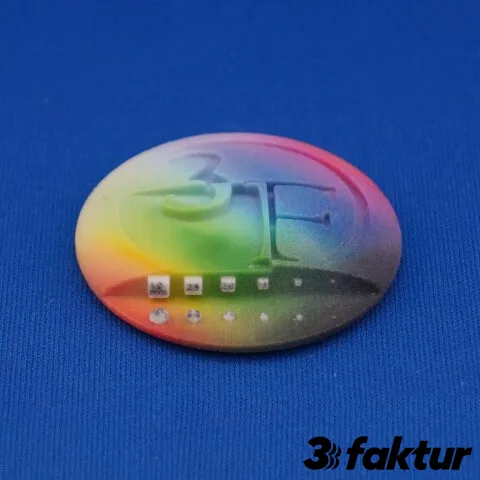
Causes of Poorly Resolved Details
Often, print quality in 3D printing is equated with layer height (Z-axis). This perception primarily comes from FDM/FFF technology. However, resolution in the X-Y plane is usually more crucial. The maximum resolution here is approximately 50 µm for very high-resolution methods (DLP, PolyJet) up to several hundred µm for all other methods. However, this is not equivalent to detail resolution, as usually multiple “layers or runs” are necessary to make the detail visible. In PolyJet and DLP, details are visible starting at 200 – 300 µm, while in all other methods, it is typically in the range of 500 – 1,000 µm.
Possible Solutions
Design your details (lettering, surface details, etc.) generously and avoid structures smaller than 500 µm.
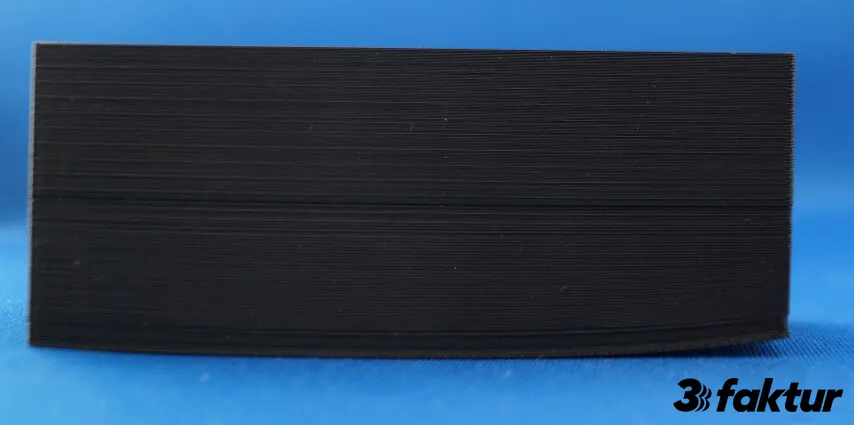
4. Problem: Printing Layers Are Visible
A fundamental element of all 3D printing processes is the division of the 3D model into numerous horizontal (Z-axis) layers (“slices”). Depending on the quality of the 3D printer and the chosen printing process, these layers may be more or less visible after printing. Since it is an essential part of the technology, it is not actually a 3D printing error but can be disturbing for some applications (e.g., master models, high-quality prototypes).
Causes of Visible Printing Layers
The appearance of printing layers is inherent to the technology and cannot be avoided in most processes. The number of layers varies with the quality of the 3D printer and the chosen method. The height of the layers in professional 3D printers ranges from 15 µm to about 200 µm. Depending on the design of the workpiece and its orientation in the printer, these layers can appear more or less pronounced. The only method currently without layer thickness is the CLIP process, which is not yet widespread (limited build volume & low cost-effectiveness).
Prevention Methods
- Let us know which surfaces are particularly important so that we can optimize the printing orientation.
- 3Faktur offers some post-processing steps that can minimize visible printing layers. Simply contact us for more information.
5. Problem: Support and Material Residues
Some 3D printing processes require support structures by design (FDM/FFF, PolyJet, stereolithography, SLM). These supports are added to prevent overhanging structures from collapsing during printing.
Causes of Residues
In some printing processes, the support material prevents protruding/fine areas from breaking off or sinking into resin. The support structures must be removed after printing, but they often leave behind small dots, lines, or scratches on the object. These are removed as much as technically possible but are often still visible depending on the process and material. Removing residues, especially in undercut areas with small openings, is very complicated because these areas cannot be reached with automated methods (e.g., vibratory finishing) or manual grinding or blasting.
How to Avoid Residues
- Consider the need for support structures in your object’s design and orientation.
- If the geometry is very complex, selective laser sintering, ColorJet, and possibly PolyJet (wax-like support easier to remove) are the preferred methods.
- By cleverly orienting the object in the 3D printer, we try to reduce support structures on your workpiece.
6.Problem: File Conversion from STP to STL
STP files are a common format in CAD programs. However, they cannot usually be used directly in 3D printing, and conversion to a 3D-printable format (usually STL) is necessary. This conversion can occur at various resolutions and is typically defined in the export function of the respective CAD program. However, resolutions are often chosen too low, resulting in very angular surfaces, especially with large models.

File Size: 0.01 MB

File Size: 0.03 MB

File Size: 0.5 MB

File Size: 3.7 MB
How to Avoid Errors:
- Choose an export resolution that strikes a reasonable balance between file size and resolution.
- Send us both the STL and STP files so that we can optimize the export settings if necessary.
More questions? Feel free to contact us and discuss your project with us.
About 3Faktur: 3Faktur specializes in 3D printing, rapid prototyping, and rapid manufacturing. We utilize HP’s Multi Jet Fusion technology and offer various materials for prototyping and series production. If you have any questions about your project, feel free to contact us.
